Launch a Linux Instance in AWS Free Tier
The AWS Free Tier offers 750 hours of EC2 (compute) and 30 GB of EBS (storage) for 12 months. This is generally sufficient for most tinkering projects - including this self-hosted blog.
This post builds on the EC2 Get started guide with the goal of optimizing performance while staying within Free Tier limits.
AWS compute resources are provisioned in a Virtual Private Cloud (VPC). This guide will use/mention the default VPC which is automatically created by AWS for each Region.
Tasks
Launch an Instance
- Open the EC2 Console https://console.aws.amazon.com/ec2/.
- Select an appropriate Region from the Dropdown. The best choice for my location is Sydney (ap-southeast-2).

- Select the Launch Instance option

- In the Name and tags section, choose a suitable name for the instance.
- In the Application and OS Images (Amazon Machine Image) section select the Quick Start tab. The Ubuntu version displayed will be the latest supported (which at the time of writing is Ubuntu Server 24.04 LTS). It is important to ensure that the selected Amazon Machine Image is labelled as Free Tier Eligible.

- The selected Instance Type should default to the Free Tier Eligible instance type for your region (either a t2.micro or t3.micro) - if it does not, select the appropriate instance type from the dropdown that bears the Free Tier Eligible label.

- Select the Create New Key Pair option that will be used to connect to the instance and save the generated key. My personal preference is the .ppk format (For use with PuTTY).

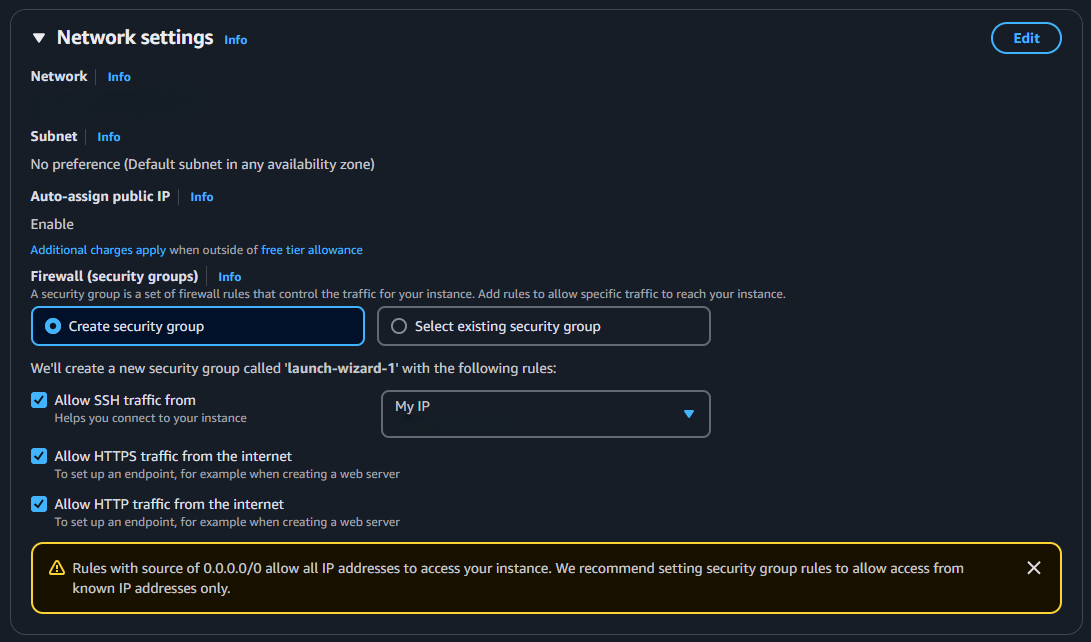
- Configure the Network Settings with the default network and subnet. Select the Create security group option and enable the following options:
- Allow SSH traffic from My IP.
- Allow HTTPS traffic from the internet.
- Allow HTTP traffic from internet.

N.B - the default network and subnet will place the instance in a public subnet - which means both a public and private IPv4 address will be allocated to the instance.
- The Configure Storage section can be left unchanged.

- Expand the Advanced Details section and navigate to the User Data section. The Free Tier EC2 instance gives us 1GB of memory, which is sufficient for standard operation, if you are installing applications or want to cater for unforeseen memory usage adding swap space gives you a memory boost.
N.B:
- The default configuration of User Data is to run once - at the initialization of the instance.
- All User Data commands are run as the root user - so we don't use sudo in the script.
- As per the Ubuntu SwapFaq: it's recommended that the swap space is maximum twice the amount of RAM depending upon the amount of hard disk space available for the system because of diminishing returns. In this case we allocate 2GB (1GB x 2).
#!/bin/bash
fallocate -l 2G /mnt/swap
chmod 600 /mnt/swap
mkswap /mnt/swap
swapon /mnt/swap
swapon --show
echo '/mnt/swap swap swap defaults 0 0' | tee -a /etc/fstab

- Review the Summary on the right panel and press the Launch Instance button.

Connect to Instance
The EC2 Get started guide demonstrates how to connect to the instance using an SSH client. There are a few alternatives to connect to the instance including EC2 Instance Connect, Session Manager, and EC2 Serial Console. Here is a guide to connect to your Linux instance using PuTTY.
To obtain the public IPv4 address of the instance, open the EC2 console, navigate to Instances, select the instance from the displayed list and the instance details will be displayed in the bottom panel (example below).


Comments ()